Safeguarding Your Delphi Applications Against SQL Injection Attacks

Introduction:

In the realm of software development, ensuring the security of applications is as crucial as their functionality, especially when dealing with database operations. SQL injection, a prevalent and dangerous form of attack, can jeopardise data integrity and security. Delphi developers, renowned for crafting robust Windows applications, must be particularly vigilant against such vulnerabilities. This blog post delves into the best practices for preventing SQL injection attacks in Delphi applications, ensuring your data remains secure and your applications unbreachable.

Understanding SQL Injection:

SQL Injection is a type of attack that exploits vulnerabilities in the database layer of an application. Attackers manipulate SQL queries by injecting malicious code, often through input fields, to gain unauthorised access to or manipulate data. This can lead to data theft, corruption, or even loss.

Why Delphi Developers Should Be Concerned:

Delphi, known for its rapid application development capabilities, is widely used for building database-driven applications. While Delphi itself is a robust language, the security of an application largely depends on how the developer handles database interactions.

Best Practices for Preventing SQL Injection in Delphi:

  1. Use Parameterized Queries: The most effective way to prevent SQL injection is by using parameterised queries. Delphi’s database frameworks, like FireDAC or dbExpress, support this feature. Instead of concatenating user inputs directly into SQL statements, use parameters. This approach ensures that the database treats user inputs as data, not as part of the SQL command.
    var
      Query: TFDQuery;
    begin
      Query := TFDQuery.Create(nil);
      try
        Query.Connection := YourConnectionObject;
        Query.SQL.Text := 'SELECT * FROM users WHERE username = :username AND password = :password';
        Query.ParamByName('username').AsString := UserInputUsername;
        Query.ParamByName('password').AsString := UserInputPassword;
        Query.Open;
      // Process the results
      finally
        Query.Free;
      end;
      end;
    
  2. Validate and Sanitise Input: Always validate user inputs on the client and server-side. Use regular expressions or built-in Delphi functions to ensure that inputs match the expected format. Sanitise the inputs by removing or encoding potentially harmful characters.
  3. Limit Database Privileges: Ensure that the database user connected to your Delphi application has limited privileges. Only grant permissions that are absolutely necessary for the application’s functionality.
  4. Use Stored Procedures: Whenever possible, use stored procedures instead of dynamic SQL. Stored procedures can encapsulate the SQL logic and provide an additional layer of abstraction, which helps in safeguarding against injection attacks.
  5. Regularly Update and Patch: Keep your Delphi environment, database server, and other related components up to date with the latest patches and updates. Security vulnerabilities are often addressed in these updates.
  6. Use TFDSecurityOptions in Delphi 12 : The latest version of Delphi includes options to restrict what commands are valid in the SQL query.

Conclusion:

In the fight against SQL injection, vigilance and best practices are your best allies. By employing parameterized queries, validating inputs, limiting database privileges, using stored procedures, and staying updated, you can significantly bolster the security of your Delphi applications. Remember, securing an application is an ongoing process, not a one-time setup. Stay informed, stay secure!

Further Resources:

For those looking to deepen their understanding and skills in Delphi and database security, consider the following resources:

  1. Embarcadero’s Official Documentation: Comprehensive guide on Delphi’s database frameworks.
  2. OWASP Guide to SQL Injection: Detailed information on SQL injection and prevention techniques.
  3. Delphi Forums and Communities: Engage with other Delphi developers to share knowledge and experiences.
  4. Online Security Courses: Many platforms offer courses specifically on SQL injection and database security.

Secure coding is not just a practice but a commitment to your application’s integrity and your users’ trust. Keep learning, keep coding, and keep your applications safe!

Formatting JSON in Delphi for maximum human readability

If you have ever wanted to format a json string in Delphi, one option is to use one of the available 3rd party JSON libraries. Starting with Delphi XE5, you can use a function called REST.Json.TJson.Format. Below I have included some sample code demonstrating the use of it. Make sure you add Rest.Json and System.Rest the the uses section on units that use this function.

program jsonformatter;

{$APPTYPE CONSOLE}

{$R *.res}

uses
  System.SysUtils,
  Rest.Json,
  System.Json;

var
  LJSONObject : TJSONObject;
  jsonString : String;
  resultStr : String;
begin
  try
    jsonString := '{"menu": { "id": "file", "value": "File", "popup": {"menuitem": [{"value": "New", "onclick": "CreateNewDoc()"},{"value": "Open", "onclick": "OpenDoc()"},{"value": "Close", "onclick": "CloseDoc()"}]}}}';
    LJSONObject := TJSONObject.ParseJSONValue(TEncoding.UTF8.GetBytes(jsonString), 0) as TJSONObject;
    resultStr := REST.Json.TJson.Format(LJSONObject);
    writeln(resultStr);
    readln;
    { TODO -oUser -cConsole Main : Insert code here }
  except
    on E: Exception do
      Writeln(E.ClassName, ': ', E.Message);
  end;
end.

Reading Bookmark Library System data files

bookmark library system logoThe school I work for has a library system called Bookmark. At the start of the year, just before the students come back, I help the librarian update all the student details in the system. I do this by exporting out the details from SAS2000 and importing them into Bookmark. Of course, as it only occurs every 12 months, we forget how to do the process each time and have to find the documentation how to do it each time. Also throughout the year, new students come and others leave. My goal was to make this all easier to handle and make it so the student details would already be in the library system before they first went to borrow a book. What follows is part of my effort to make it easier to keep the library system up to date.

Bookmark Library System

Reverse Engineering the File Format

Bookmark uses its own custom binary file format. It stores various details in different files making a kind of relational database. To help reverse engineer the file format, I used a hex editor. The borrower names are stored in a file called BORROWER.DAT. Some extra info about the borrower is stored in a file called BORRCMTS.DAT. In the hex editor, it shows the location of different pieces of data in the file. From this I was able to determine that each borrower had a record of 256 bytes, with a 256 byte header at the start of the file. Also for borrowers that have been deleted the relevant 256 byte section is simply zeroed out. The next step was to split each record up into the fields.

  TLibraryStud = record
    Name     : array[0..26] of AnsiChar;
    XX       : array[0..1] of AnsiChar;
    Group    : array[0..8] of AnsiChar;
    MaxCount : BYTE;
    xxx      : BYTE;
    Addr     : array[0..29] of AnsiChar;
    City     : array[0..19] of AnsiChar;
    postcode : array[0..5] of AnsiChar;
    Phone    : array[0..11] of AnsiChar;
    Group2   : array[0..1] of AnsiChar;
    Gender   : ansichar;
  end;

After a bit of guessing and trail and error I came up with the record above to hold the data.

Saving Borrower Details to Database

First I created a table called bookmark in a database in SQL Server. This table stored the same info as what was in the bookmark data file. Because the record id’s don’t change, I am able to simply delete all the data in the bookmark table and reload it from the bookmark files. I do this in a transaction, so that if anythings fails, I am able to rollback to the last complete successful import.
Below is the final code to make it work.

procedure TDataModule.LoadBorrowers(path:String);
var
  FromFStream : TFileStream;
  FromF2Stream: TFileStream;
  NumRead,numRead2, NumWritten: Integer;
  str : AnsiString;
  stud : TLibraryStud;
  studCom : TLibraryStCm;
  filename,filename2 : String;
  currentPos : Integer;
  lastPos : Integer;
  i : Integer;
begin
  filename  := IncludeTrailingPathDelimiter(path) +'BORROWER.DAT';
  filename2 := IncludeTrailingPathDelimiter(path) +'BORRCMTS.DAT';

  if(not (FileExists(filename) and FileExists(filename2))) then
    begin
      Exit;
    end;
    FromFStream := TFileStream.Create(filename,fmOpenRead or fmShareDenyNone);
    FromF2Stream := TFileStream.Create(filename2,fmOpenRead or fmShareDenyNone);
  begin
    begin
        lastPos := 0;
    i := 0;

      ADOConnection1.BeginTrans;
      ADOQuery1.SQL.Text := 'DELETE FROM Bookmark;';
      ADOQuery1.ExecSQL;
      ADOQuery1.SQL.Text := 'INSERT INTO Bookmark (tid,Name,Group1,Addr,City,Postcode,Phone,Group2,Gender,AdminID,maxCount) VALUES(:ID,:name,:group1,:addr,:city,:postcode,:phone,:group2,:gender,:adminID,:maxCount);';

    try
      repeat
        FromFStream.ReadBuffer(stud,128);
        FromF2Stream.ReadBuffer(studCom,64);
        if((length(Trim(stud.NAME))<>0) and (i>0)) then
         begin
          ADOQuery1.Parameters.ParamByName('ID').Value := i;
          ADOQuery1.Parameters.ParamByName('name').Value := Trim(stud.NAME);
          ADOQuery1.Parameters.ParamByName('group1').Value := StripNonAscii(Trim(stud.Group));
          ADOQuery1.Parameters.ParamByName('addr').Value := Trim(stud.Addr);
          ADOQuery1.Parameters.ParamByName('city').Value := Trim(stud.City);
          ADOQuery1.Parameters.ParamByName('postcode').Value := Trim(stud.postcode);
          ADOQuery1.Parameters.ParamByName('phone').Value := Trim(stud.Phone);
          ADOQuery1.Parameters.ParamByName('gender').Value := Trim(stud.Gender);
          ADOQuery1.Parameters.ParamByName('group2').Value := Trim(stud.Group2);
          ADOQuery1.Parameters.ParamByName('adminID').Value := StringReplace(Trim(studcom.barcode), '-', '/', [rfReplaceAll, rfIgnoreCase]);
          ADOQuery1.Parameters.ParamByName('maxCount').Value := stud.MaxCount;
          ADOQuery1.ExecSQL; 
         end;
        Inc(i);
      until (FromFStream.Position-FromFStream.Size=0);
    finally
      FreeAndNil(FromFStream);
      FreeAndNil(FromF2Stream);
      ADOConnection1.CommitTrans;
    end;
    end;
  end;
end;

Automating Import

To ensure the data is always up to date in the SQL Server database, as part of the backup process each night, this program is run with Windows Task Scheduler.

Going further

Bookmark has more files that can be imported in a similar way. Files for book records, loan data and book reviews are all there.

Working with 64-bit Windows Applications

Microsoft Windows has had a 64-bit version since they first brought out a 64-bit version of Windows XP. The 64-bit version of Windows XP was not well supported by many programs, but started the progress of conversion of Windows to 64-bit. One of the main things that 64-bit enables is addressing greater than 4Gb of memory. In the last year or two, it is finally getting to the point where low-end machines come with more than 4Gb of memory. 64-bit also helps with memory layout randomization. 64-bit increases the number of possible locations that memory can be allocated to, making it harder to complete a successful buffer overflow attack. The other thing that 64-bit version allows is various new CPU instructions. These can help improve performance for various tasks.
64-bit apps from task manager

64-bit drawbacks

One of the drawbacks is that you need 64-bit drivers for all your hardware. At this point though, this is unlikely to be an issue as all new hardware will come with 64-bit drivers. For very old hardware though, there may be no 64-bit driver and make it so the old piece of hardware has to be replaced. 64-bit apps also generally require more memory. This is because to store a memory address you need to use a 64-bit pointer instead of a 32-bit pointer. Finally, although 64-bit versions of Windows support running 32-bit programs, some programs that support plugins need to have plugins that are the same as the parent app.

64-bit Windows Programs

Waterfox
Waterfox is a 64-bit version of Firefox. My usage pattern definitely benefits from the 64-bit version. I quite often have 150+ Tabs open and have seen memory usage up to 6.5Gb.
7-zip
7-Zip has a 64-bit version of the program. This would benefit from the new 64-bit instructions and the ability to more easily handle larger than 2Gb zip files.
Microsoft Office
I have been running the 64-bit version of Microsoft office since 2010. Compatibility with other programs can be a big issue with office, as the programs need to be 64-bit as well. This can be an issue for many older programs that have not been updated for a long time. Even many current versions of programs still don’t have 64-bit versions. The only way to deal with that is to remove the 64-bit version of Office and install the 32-bit version of Microsoft Office.
The biggest issues are programs that use Microsoft Word for Mail Merging, Outlook for setting emails and programs that need to be able to read Microsoft Access .accdb files. One of the issues that the 64-bit office version has caused me is that it makes it very difficult to develop in Delphi and use the latest the .accdb file format. This is because the Delphi IDE is 32-bit and the driver to read the .accdb file is 64-bit. This means that while you can develop a 64-bit version of an app that uses the driver, you can use all the RAD environment in Delphi.

Automatically creating Active Directory accounts for students – Part 1

Active Directory logo
At the school where I work, student details are stored in a student administration system called SAS2000. This stores lots of information about each student like name, date of birth, year level, parents names, enrollment dates and their student ID number. The actual data is stored in a SQL Server database on one of our servers.

I wanted to create something that would be able to be hopefully modified by someone other that me in the future, so I chose to use vbscript, instead of my preferred language of Delphi for this task. At first I had code to query the Student table in the SQL Server database and then some functions to query Active Directory. This made the code balloon up in size and was getting to complicated.

Querying Active Directory with SQL Server

ADSI
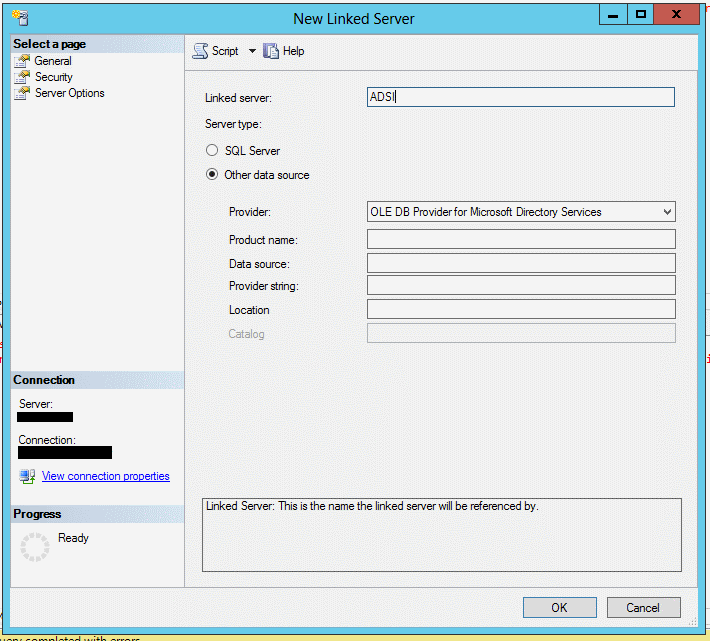
After a bit of research on the internet I found that you could use a feature of SQL Server to show active directory accounts as a table. This involved creating a connection to AD in the linked servers section of Management Studio and then creating a view called AD_Student with the code shown below. This uses the OLEDB Provider for Microsoft Directory Services.

SELECT sn, givenName, cn, sAMAccountName, title, employeeID, facsimileTelephoneNumber, 
            mobile, mail, telephoneNumber, displayName
FROM OPENQUERY(ADSI,'SELECT displayName, telephoneNumber, mail, mobile, 
    facsimileTelephoneNumber,employeeID ,title,sAMAccountName, cn,givenName,sn  
         FROM  ''LDAP://domain.local/OU=Students,DC=domain,DC=local'' WHERE objectClass =''User'' ')
         AS tblADSIORD

You obviously need to replace LDAP://domain.local/OU=Students,DC=domain,DC=local with what is relevant to your Active Directory domain.

Linking data from Active Directory with a SQL Server table

In SAS2000 each student gets an ID code that is unique to them. Each AD user account also gets a unique GUID. My first idea was to create a table that linked the Student ID Code from the SAS2000 student table to the account GUID in active directory. Unfortunately I wasn’t able to work out how to get the GUID with VBScript. My next idea was to alter the AD Schema. After some further reading however, I came across an existing field in Active Directory called EmployeeID. Obviously students aren’t employees, but it is a near enough match. So I went through all the students accounts and manually added their Student ID Code from the SAS2000 table to the EmployeeID field in Active Directory.

From this I was able to create another view that uses a “NOT IN” query that results in a list of students that are not in Active Directory Yet.

SELECT ID, Code, FirstName, MiddleName, LastName, PreferredName, PostNominal, NName, FormerName, TransferCode, FC2kSourceID, FC2kID, FC2kCode, Cases21ID, Cases21Code, AddressID, LeavingAddrID, NewAddrID, PhoneFamily, PhoneHome, PhoneMobile, Email, Email2, FamilyID, DOB, NDOB, Sex, CreatedWhen, UpdatedBy, UpdatedWhen, Comments, COB, PlaceOfBirth, Religion, House, Form, Distance, StudentType, HomeGroup, Year, Class, Rank, Youngest, Oldest, EntryYearLevel, StartYear, StartDate, PrevSchoolID, PrevLevel, PreEnrolment, Inactive, InactiveFrom, InactiveTo, InactiveReason, Vsn
FROM dbo.SAS_Student
WHERE (Code COLLATE DATABASE_DEFAULT NOT IN (SELECT StudentID FROM dbo.AD_Student))

This query shows any students that are enrolled, but don’t yet have a Active Directory user account. See Part 2 for actually creating the account in Active Directory.

Restoring a Vista backup that wouldn’t restore with Windows Backup

windows backup icon
After completing a backup with the backup program in Vista and then wiping the computer and reinstalling Vista and updating to Service Pack 2 and later updates, I discovered the backup program wouldn’t restore the backup. Fortunately the backup program in Windows Vista as well as the backup program in Windows 7, store all the files in a series of compressed zip files that of about 200Mb in size. Files larger than this a split over multiple files, but not in the standard zip spanning method.

Attempt 1

My first attempt at uncompressing all the files was to use this was to use the 7-zip command line in a batch file with a FOR loop.

@ECHO OFF
REM unzipbackup.bat
c:\Program Files\7-zip\7z e %1 -oc:\output\

@ECHO OFF
REM restoreback.bat
FOR %%G in (*.ZIP) do unzipbackup.bat "%%G"

This worked for the most part – but asked many times to overwrite an existing file. This was obviously not going to be satisfactory for the customer.

Attempt 2

With my next attempt I opened up Embarcadero Delphi XE2, and created a console project. The first step was to get a list of the zip files that made the complete backup. This particular backup contained over 270 zip files. I used FindFirst/FindNext .. FindClose, but this resulted in the files not listed in the correct order. After a initially trying to split the filename up and extract the number part of the filename, a bit of googling turned up a windows API call called StrCmpLogical. Next I tried using the TZip component included with XE2. After trying to extract the files with the component, I found that it was only creating 0 byte files. A bit more googling trying to work out what I was doing wrong turned up a bug report for the component. It had a suggestion to fix the code, but I wasn’t quite sure where to apply it and I wasn’t confident that it would cause corruption of the data anyway.

Attempt 3

Back to google. After some more searching, I settled on TZipMaster. After trying to use the ForEach method of TZipMaster to extract the files, I found that it was doing exactly the same thing as TZip – creating the files but not copying data into them.

 function ForEachFunction(theRec: TZMDirEntry; var Data): Integer;
 var
   iData: Int64 Absolute Data;
   fStream : TFileStream;
 begin
    // code to open filestream and copy data from one stream to the other.
 end;

  ZipMaster.ForEach(ForEachFunction, total);    

Final Attempt

Instead of using the ForEach function of TZipMaster, I changed it to just loop through the DirEntry property, which stores info about each file in the zip file. FEfunc1 is called for each file in the zip. This function will create the path that is indicated in the zip file (using ForceDirectories). If the file already exists, the data will be appended to the existing file. This correctly restores the files that span multiple zip files.


 function ForEachFunction(theRec: TZMDirEntry; var Data): Integer;
 var
   iData: Int64 Absolute Data;
   fStream : TFileStream;
 begin
   Result := 0;         // success
   iData := iData + theRec.CompressedSize;
   Writeln(outputPath +theRec.FileName);
   WriteFileLog(outputPath +theRec.FileName);

   if(not FileExists(outputPath +theRec.FileName)) then
     begin
       ForceDirectories ( ExtractFilePath(outputPath +theRec.FileName));
       fStream := TFileStream.Create(outputPath +theRec.FileName,fmCreate);
       try
         theRec.UnzipToStream(fStream);
         WriteFileLog(outputPath +theRec.FileName +' ' + IntToStr(fStream.Size)  + ' ' + IntToStr(theRec.UncompressedSize));
       finally
         FreeAndNil(fStream);
       end;
       FileSetDate(outputPath +theRec.FileName, DateTimeToFileDate(theRec.DateStamp));
     end
   else
     begin
       WriteBigFileLog(outputPath +theRec.FileName);
       fStream := TFileStream.Create(outputPath +theRec.FileName,fmOpenReadWrite);
       try
         fStream.Seek(0,soFromEnd);
         theRec.UnzipToStream(fStream);
       finally
         FreeAndNil(fStream);
       end;
       FileSetDate(outputPath +theRec.FileName, DateTimeToFileDate(theRec.DateStamp));
     end;
 end;

   for i:=0 to ZipMaster1.Count-1 do
     begin
      try
       ForEachFunction(ZipMaster1.DirEntry[i],total);
      except
          on E : Exception do
            WriteErrorLog(ZipMaster1.DirEntry[i].FileName + ' ' + e.Message);
      end;
     end;

Unfortunately, because I had limited time to complete the restore, I wasn’t able to fully complete what would be required create a fully not destructive restore. Some of the files in the zip file actually represent attributes of other files. Also some extra details about the files is also stored in a .wbcat file that is a binary file. But fortunately I had recovered the data and was able to hand the computer back.